Labels

Saturday, December 31, 2011

Courageous Sign

This is the 3rd sign I have made no, so I tried to make it more challenging. Oh, I succeeded with that, but somehow in the end it turned out great! I cut out my letters on vinyl with the cricut and then painted my board black. Since I only wanted the letters black I only painted the middle part. FAIL!! Do you know how hard it is to paint over black???? Next I added a layer of gold to outline courageous. To keep the gold I placed a larger vinyl version of the word courageous and then painted red over the top. UGH it looked TERRIBLE! I mean absolutely terrible. The black streaked through the red and not in a cute artsy way. I added 4 layers of red, then a darker brick red, and IT STILL SHOWED STREAKY BLACK! 

In a last ditch effort before I threw it away (yes I was about to do just that) I painted a layer of brown on top and like magic, it saved the sign. This was a gift for Chris and I was working on it on New Years Eve with Lindsay (yes his birthday is New Years day....procrastination is my thing) so I really didn't have time to start over!


*UPDATE: While repainting the bathroom cabinets I found this stain blocking primer for $8 at Home Depot, this would have been a solution to painting over black!

Sunday, November 27, 2011

Refill Lysol no-touch soap dispenser

I LOVE my Lysol no-touch soap dispenser but I hate that you have to buy those refills! My frugal self asked my enginerd husband to find a way to remove the cap so I can refill it with any soap. He popped that sucker off so fast with his screw driver I felt dumb that I spent 10 minutes trying remove it with my hands...The point is I can now refill that little bottle over and over again!


Wednesday, November 9, 2011

Rotini with chicken sausage & vegetables

Rotini with Chicken sausage & vegetables

Ingredients: 

1 head of broccoli
1 box rotini pasta
2 TBS olive oil
4 sweet italian cooked chicken sausages cut into 1/4" cuts
4 cloves garlic
1 can chicken broth
1 tsp pepper
1/2 cup basil

Directions:

1) Boil water and cook broccoli for 3 minutes then scoop (do not drain water) broccoli out of water.
2) Using the same water boil your noodles about 14 minutes.SAVE 1 CUP OF THAT WATER.
3) In a seperate cook sausage in olive oil.
4) Add garlic and broccoli and cook for 2 minutes.
5) Add chicken broth, 1 cup of water from step 2, oregano, salt, and pepper. Simmer for 2 minutes.
6) Add in noodles and let sit for a couple of minutes before serving.

Tuesday, November 8, 2011

Sewing a blanket

This is my first sewing project and luckily I had great supervision from my mother in law!

1) Cut your fabric the length you need. We went t Joann  Fabric and they had this cute monkey panel so all we needed to do was find a color for the back and trim it down.

2) Place the "good side" of the fabrics together 

3) Measure and cut quilting batting to the size you need. We actually stacked 3 sheets but they do sell batting in different thicknesses. This made this project a little bit more challenging.  

4) Put your 2 pieces of fabric (with the print on the inside) on top of your batting 

5) Pin your fabric and batting together making sure your pin is pointing to the end of your fabric or when you go to sew it you can break your needle on the pin.

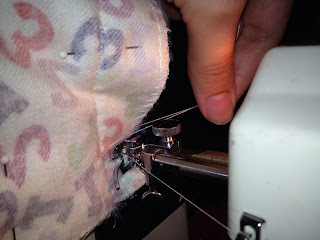
6) When you start to run your fabric through the sewing machine you have to hold on to the string until the needle goes into the fabric and then you can let go. Let the machine pull the fabric (if you pull too hard your string will break and you will have to re-thread your machine...I did this twice!)

7) Run the fabric straight through, then turn your fabric to the next side and do it again. On one side sew to the middle and stop so you can create an opening big enough for you to get your hand in. When you are finished there will be an x in each corner. You want to cut the end off so you can make a pointed corner but DO NOT CUT THE X 

8) Put your hand in the opening you created and gently pull your fabric through so that it is right side out. Iron all 4 sides of your blanket to help it lay flat.

8) Now you have to hand sew your opening and this part sucks! When you iron your blanket it will create a line that you can follow to close the blanket. The trick to this is to pinch both sides and sew on that line. Sadly it took me 5 minutes to figure this part out..

Now you are finished! Not too shabby for my first sewing project! 

Monday, October 24, 2011

Stops pots from boiling over

It really works! Just put a wooden spoon on the top of your boiling pot and it stops it from boiling over! In this picture I was cooking macaroni and cheese and this trick saved me from a mess on my stove!


Sunday, October 9, 2011

Skinny zucchini baked ziti

Skinny zucchini baked ziti

This was originally a crockpot meal off of ziplist  http://get.ziplist.com/(an ap that you can make your grocery list on that is fabulous because my husband can add to the list from his ipad anytime), but I waited too long to make it so I decided to try and improvise a baked version. I am not the kind of cook that can invent new meals out of nothing so this was a big risk for me! The recipe makes enough for 8 so I divided it in half so I can freeze one. The things in blue I added or changed to suite my needs. The best part about this is I get my husband to eat a vegetable!

  • posted from http://www.ziplist.com/recipes/344636-Skinny_Zucchini_Ziti?return_to=%2Frecipes%2Fsearch

    Ingredients 

    • 1 (1 lb. 7.8 oz.) jar marinara (no sugar added)
    • 3 cups penne shells (whole grain, dry)
    • 2 cups fat free cottage cheese
    • 2 cups skim mozzarella cheese, shredded
    • 1 large zucchini (1/4รข€ slices)
    • 1 tablespoon fresh oregano (finely chopped)
    • 1 tablespoon fresh basil (finely chopped)
    • 1/4 teaspoon black pepper
    • * 1/4 teaspoon garlic salt
  • Instructions for the crockpot

    In a large mixing bowl combine cottage cheese, mozzarella, oregano, basil and black pepper. In the slow cooker, spoon 1/4 of marinara onto the bottom, add 1 cup penne shells, 1/3 of zucchini slices and top with 1 cup cheese mixture. Repeat until you have 3 layers. Top off with the remaining marinara and lastly, cheese.

    1. Note: Keep penne shells and cheese away from the edges by about 1"€. Pasta tends to get hard and cheese burns if allowed to touch the sides while cooking.
    2. Cover and cook on low for approximately 2 hours or until penne noodles are Al Dente (firm but not hard). Not all slow cookers cook the same so be sure that the penne is done before serving. The cook time is recommended based on the slow cooker used when preparing this recipe. Allow to cool for 15 minutes before serving.
    3. Tip: If you prefer your ziti a little more on the thick side, allow to cook an additional 30 minutes to 1 hour.
    4. Tip: If you're on a tight budget try Ragu Lite (no sugar added) and if you're not, try Amy's Organic Marinara Pasta Sauce.
    5. Pair a serving of this with a chicken breast and a helping of veggies for a wonderfully balanced meal!

Instructions to bake

Preheat your oven to 350 degrees.

Boil penne noodles until they are al dente. Drain and rinse in cold water (to stop the cooking process since you are going to bake it anyway and to prevent them from sticking together while you are trying to layer).

Cut the zucchini into thin slices (I did not cook them first) and make your cheese mixture.

Add your marinara sauce on the bottom of the dish, next add a layer of noodles, top it with your zucchini slices, followed by your cheese mix. Repeat this 3 times.

Cover the dish with tin foil for the first 15 minutes to prevent the cheese from burning and the noodles drying out. Cook for an additional 20 minutes and enjoy!


Thursday, October 6, 2011

Basket organizer

My husband is always complaining about how I store our togo cups. We do not have enough cabinet space for them so they are in a basket and everytime he tries to slide it out he knocks all the cups over (even though this would not happen if he pulled the basket out slower...) so I came up with a simple solution!
 
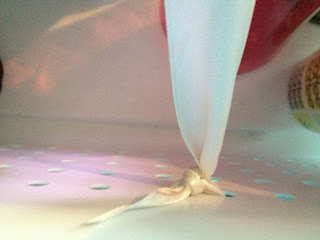
I always keep ribbons off of packages,and now I have a great way to use them! Simply tie a ribbon on one of the top holes on each side of the basket to create rows. Make sure it is as tight as you can get it to work the best.
 
Now I have nice rows AND the cups do not fall over!


Canvas print

I have been wanting to make my own canvas prints ever since I first saw the idea on pinterest! My first attempt did not go so well since I did not really pay attention to the directions. I made a couple of mistakes and the 1st was when I went shopping for canvas I guessed at the size and I was way off. My 2nd mistake was I printed on computer paper so when I went to glue on top, there was some bleeding of the ink when I tried to put on the top layer of modge podge, and it just looked cheap and I had to peel it off and try again. I wanted something that did not look like I made it. 

After going back to pinterest and reading more carefully that you get a PICTURE ENLARGED which is available at walmart for about $5. 
Then it is as as simple as:
1) Paint the canvas a color of your choice with craft paint or use scrapbook paper and modge podge with MATTE finish on the side.

2) Trim your ENLARGED picture to fit your canvas OR buy a canvas the size of your enlargement...

3) Cover the canvas AND the back of your photo with modge podge.

4) Line up your photo and press it onto your canvas and make sure you get out all of the air bubbles.

**TIP: place a book under your canvas, it makes it easier to get you picture on. Canvas will stretch and it makes it hard to apply even pressure**

5) Add another layer of modge podge over the entire thing and let it dry!


Friday, September 16, 2011

Dolly's Apple Pie

Dolly's Apple Pie

My mother-in-law makes the BEST apple pie, and now so do I! At least that is what my husband tells me!

You need:

3-6 pared, cored and THINLY sliced apples
1 cup sugar
2 TBL flour
1 TSP ground cinnamon
dash ground nutmeg
2 TBL butter
Pastry for 9" pie crust**See below

Directions:

Preheat oven to 350 degrees
1) Combine all dry ingredients in a bowl.
2) Toss apples in mixed dry ingredients. Make sure all of the pieces get coated.
3) Place apples in pie crust
4) Add divided butter evenly on top of apples.
5) Place top crust over apple mixture and seal the top crust to the bottom crust.
6) Add a couple of slits in top to vent and sprinkle the top with sugar.

Bake for 50 minutes or until golden brown.

** I buy my crust at the store in the refrigerated section.
 
You can also buy a frozen crust that usually comes 2 in a pack. Just fill one crust and remove the other from the tin and place it on top. If it does not transfer well you can use a rolling pin to re roll out a new crust.

Monday, June 6, 2011

Bible verse sign

I really wanted to have a bible verse in the baby's room so I decided to make one. 

1) Cut a board to the size you want (home depot will do this for you)
2) Sand the board down and paint (2x's) it the color you want your letters to be
3) Use scrapbooking stickers to spell out your saying
4) Paint over the letters on the top of the board ( I left the sides brown. Tweezers are very helpful for this step.
5) This is an optional step where you can sand the top edges and the base coat will show
6) Use modge podge to seal it

Next time I will pay more attention to the spacing of my letters, but it still works :)